从情感分析到市场营销:网络抓取 Twitter 的诸多好处
Raluca Penciuc,2023 年 4 月 13 日

Twitter 是一个流行的微博和社交网站,允许用户发布称为 "tweets "的信息并与之互动。这些推文可包含各种信息,包括文本、图片和链接,因此成为各种用例的宝贵数据源。
从个人研究人员到公司,网络搜索 Twitter 可以有很多实际应用:趋势和新闻监测、消费者情绪分析、广告活动改进等。
虽然 Twitter 提供了一个 API 供您访问数据,但它也提出了一些您应该注意的问题:
- 速率限制:在给定时间内,您只能发出一定数量的请求。如果超过这些限制,您的 API 访问可能会被暂时中止;
- 数据可用性:您只能访问有限的数据集,如推文、用户资料和直接消息。有些数据(如已删除的推文)无法通过 API 获取。
在本文中,我们将讨论使用 Typescript 和 Puppeteer 对 Twitter 进行网络刮擦的过程。我们将介绍设置必要的环境、定位和提取数据以及这些数据的潜在用途。
此外,我们还将讨论为什么使用专业的搜索器进行 Twitter 网络搜索比单独使用 Twitter API 更好。本文将逐步介绍如何有效地网络搜刮 Twitter,让您轻松收集所需的数据。
先决条件
在开始之前,让我们先确保我们已经准备好了必要的工具。
首先,从官方网站下载并安装 Node.js,确保使用长期支持 (LTS) 版本。这也将自动安装 Node Package Manager(NPM),我们将使用它来安装更多依赖项。
在本教程中,我们将使用 Visual Studio Code 作为集成开发环境 (IDE),但您也可以选择使用任何其他 IDE。为项目创建一个新文件夹,打开终端并运行以下命令来创建一个新的 Node.js 项目:
npm init -y
这将在项目目录中创建package.json文件,其中将存储有关项目及其依赖项的信息。
接下来,我们需要安装 TypeScript 和 Node.js 的类型定义。TypeScript 提供可选的静态类型,有助于防止代码出错。为此,请在终端运行
npm install typescript @types/node --save-dev
您可以运行
npx tsc --version
TypeScript 使用名为tsconfig.json的配置文件来存储编译器选项和其他设置。要在项目中创建该文件,请运行以下命令:
npx tsc -init
确保 "outDir"的值设置为 "dist"。这样我们就能将 TypeScript 文件与编译文件分开。有关此文件及其属性的更多信息,请参阅TypeScript 官方文档。
现在,在项目中创建一个 "src "目录和一个新的 "index.ts"文件。我们将在这里保存刮擦代码。要执行 TypeScript 代码,必须先编译它,因此为了确保我们不会忘记这个额外的步骤,我们可以使用自定义命令。
前往 "package.json"文件,然后像这样编辑 "脚本"部分:
"scripts": {

    "test": "npx tsc && node dist/index.js"

}
这样,在执行脚本时,只需在终端中输入 "npm run test"即可。
最后,我们将使用 Puppeteer 从网站上抓取数据。Puppeteer 是 Node.js 的无头浏览器库,可以控制网络浏览器并以编程方式与网站交互。要安装它,请在终端运行以下命令:
npm install puppeteer
当你想确保数据的完整性时,强烈建议使用它,因为如今许多网站都包含动态生成的内容。如果你很好奇,可以在继续阅读Puppeteer 文档之前先查看一下它的功能。
数据位置
现在环境已经搭建完毕,我们可以开始提取数据了。在本文中,我选择抓取 Netflix 的 Twitter 个人资料:https://twitter.com/netflix。
我们将提取以下数据:
- 配置文件名称;
- 轮廓把手;
- 用户简历;
- 用户位置;
- 用户网站;
- 用户加入日期;
- 用户跟随计数;
- 用户粉丝数;
- 有关用户推文的信息
- 作者姓名
- 作者句柄
- 发布日期
- 文字内容
- 媒体(视频或照片)
- 回复数
- 转发数
- 喜欢数
- 查看数。
您可以在下面的截图中看到所有这些信息:
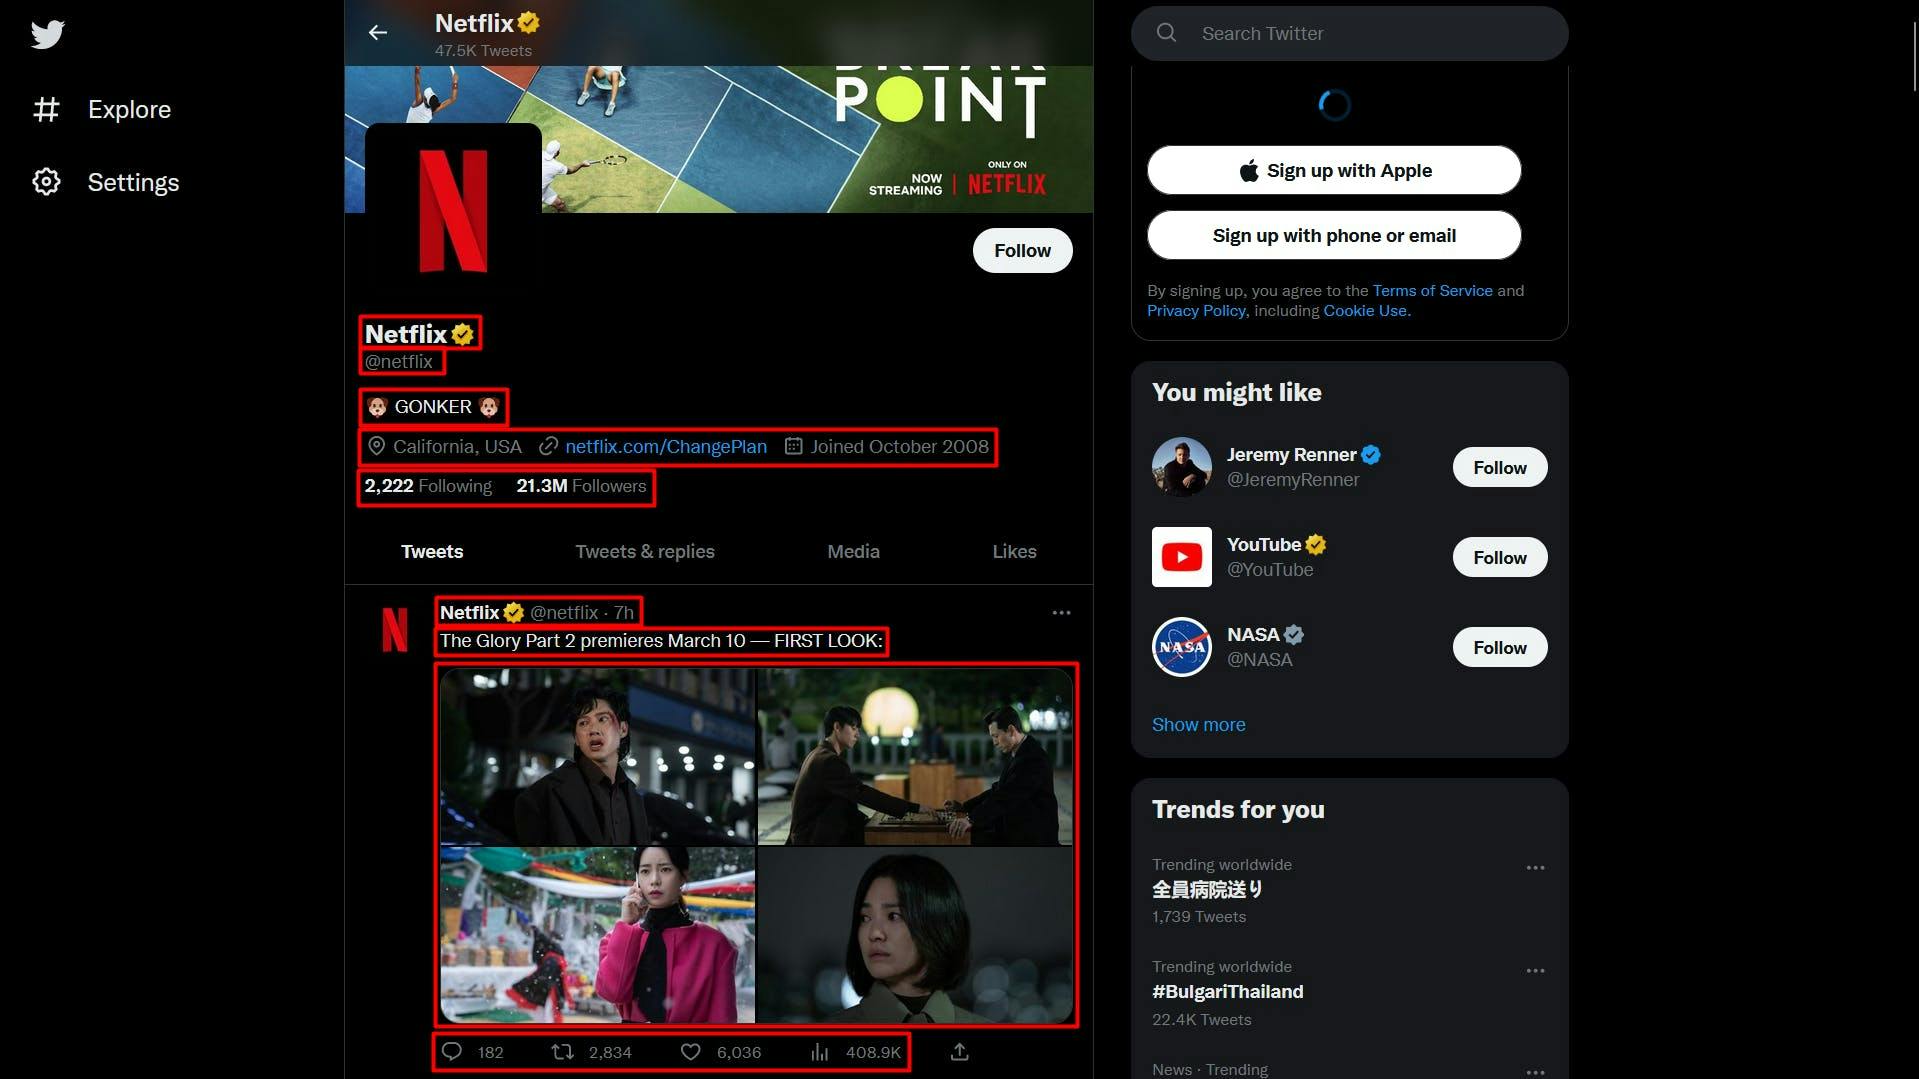
打开每个元素上的 "开发工具",你就能看到我们用来定位 HTML 元素的 CSS 选择器。如果你对 CSS 选择器的工作原理还不太了解,请参考这本新手指南。
提取数据
在编写脚本之前,让我们验证一下 Puppeteer 的安装是否顺利:
import puppeteer from 'puppeteer';

async function scrapeTwitterData(twitter_url: string): Promise<void> {

    // Launch Puppeteer

    const browser = await puppeteer.launch({

        headless: false,

    	  args: ['--start-maximized'],

    	  defaultViewport: null

    })

    // Create a new page

    const page = await browser.newPage()

    // Navigate to the target URL

    await page.goto(twitter_url)

    // Close the browser

    await browser.close()

}

scrapeTwitterData("https://twitter.com/netflix")
在这里,我们打开一个浏览器窗口,创建一个新页面,导航到目标 URL,然后关闭浏览器。为了简化和可视化调试,我将浏览器窗口最大化为无头模式。
现在,让我们来看看网站的结构,并逐步提取之前的数据列表:
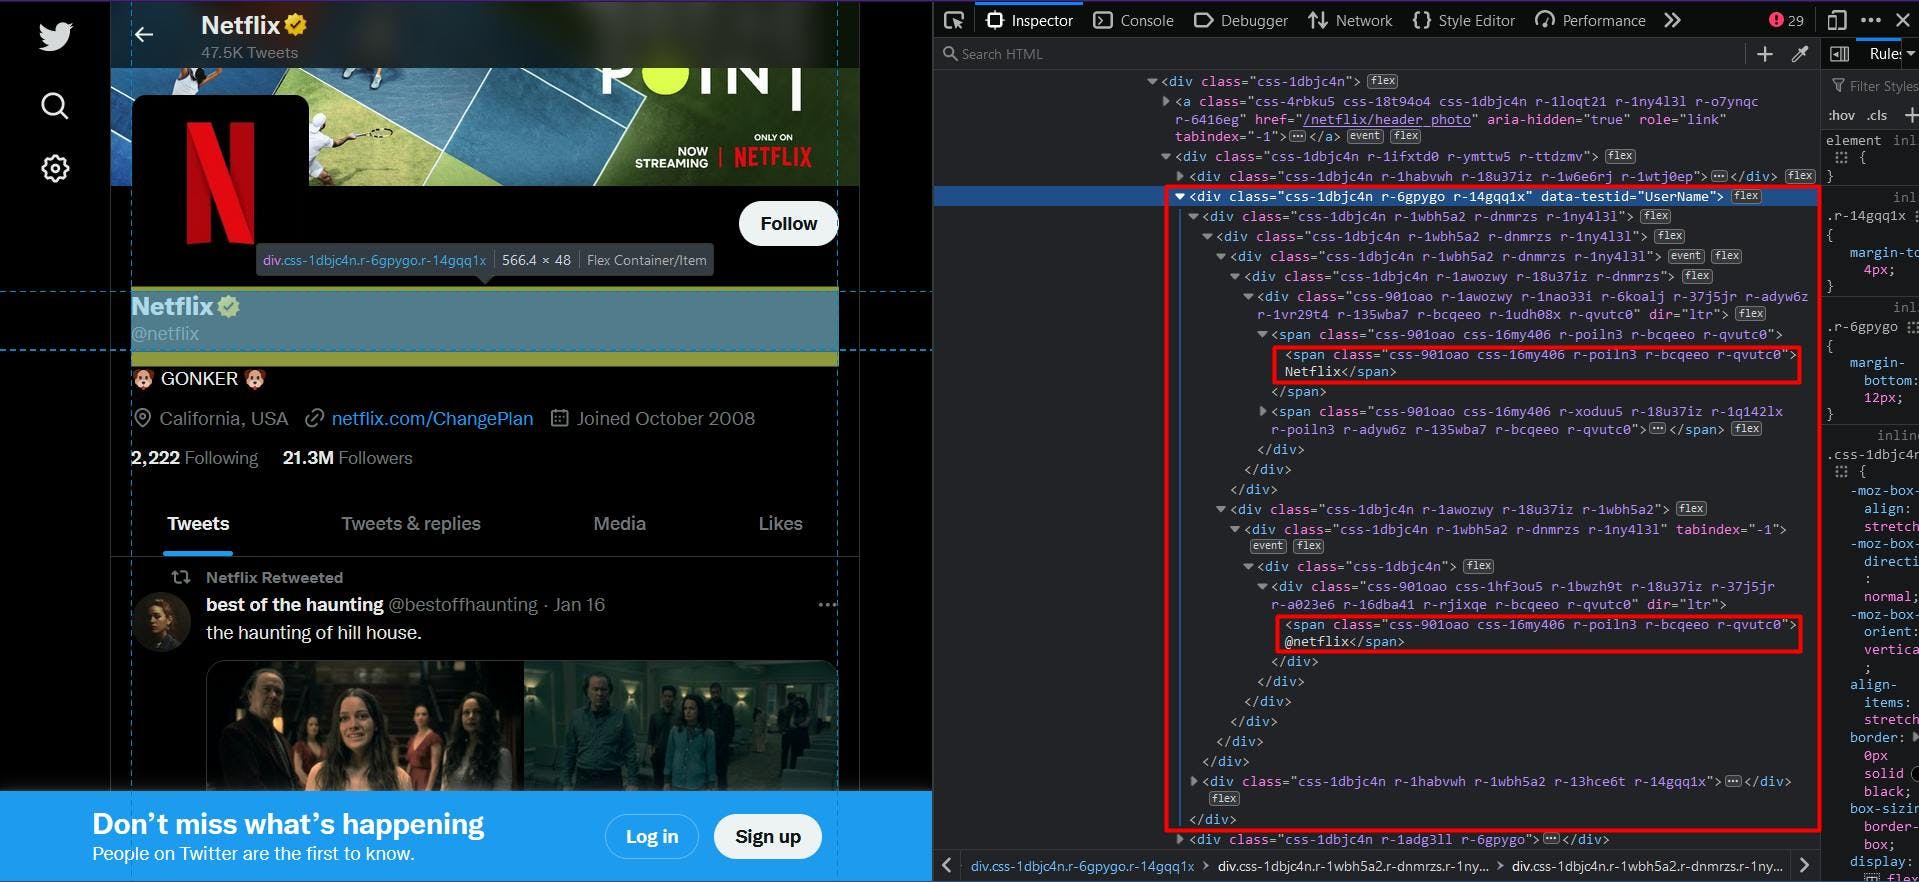
乍一看,你可能会发现网站的结构相当复杂。类名是随机生成的,很少有 HTML 元素是唯一标识的。
幸运的是,在浏览目标数据的父元素时,我们发现了属性 "data-testid"。在 HTML 文档中快速搜索一下,就能确认该属性唯一标识了我们的目标元素。
因此,为了提取配置文件名称和句柄,我们将提取 "data-testid"属性设置为 "UserName"的 "div "元素。代码如下
// Extract the profile name and handle

const profileNameHandle = await page.evaluate(() => {

    const nameHandle = document.querySelector('div[data-testid="UserName"]')

    return nameHandle ? nameHandle.textContent : ""

})

const profileNameHandleComponents = profileNameHandle.split('@')

console.log("Profile name:", profileNameHandleComponents[0])

console.log("Profile handle:", '@' + profileNameHandleComponents[1])
由于个人档案名称和个人档案句柄的父级相同,最终结果将显示为串联。为了解决这个问题,我们使用 "分割 "方法来分离数据。
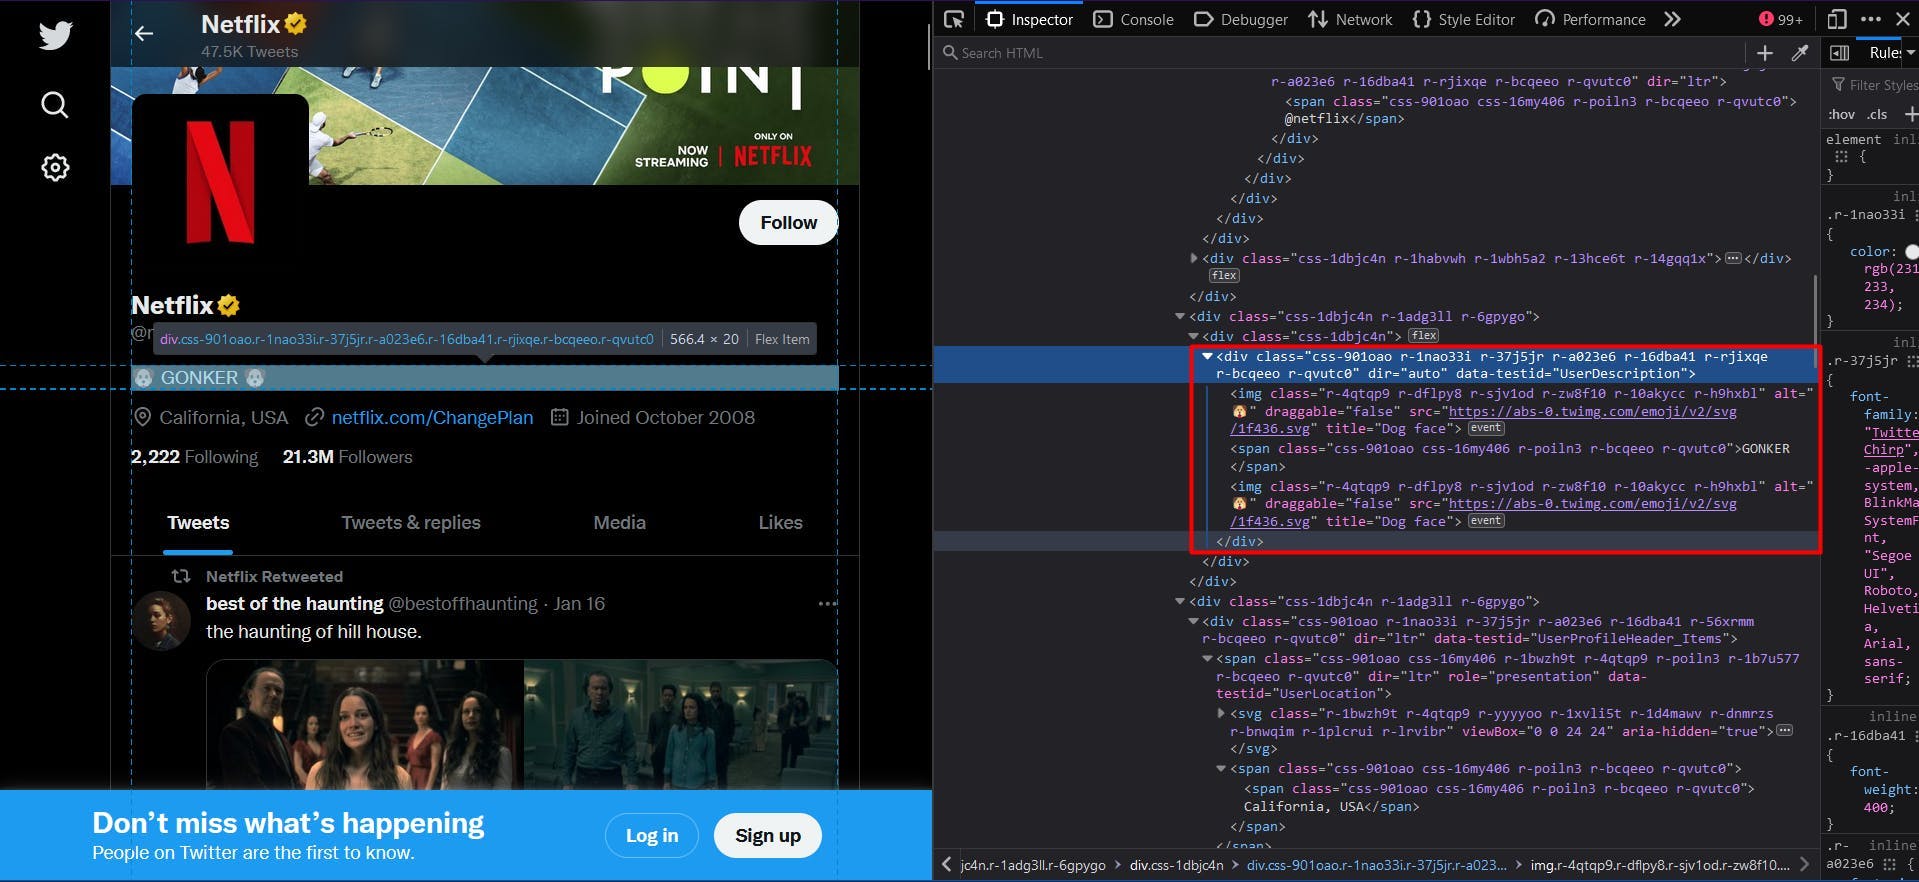
然后,我们应用相同的逻辑提取个人资料的简历。在本例中,"data-testid"属性的值是 "UserDescription":
// Extract the user bio

const profileBio = await page.evaluate(() => {

    const location = document.querySelector('div[data-testid="UserDescription"]')

    return location ? location.textContent : ""

})

console.log("User bio:", profileBio)
最终结果由 HTML 元素的 "textContent"属性描述。
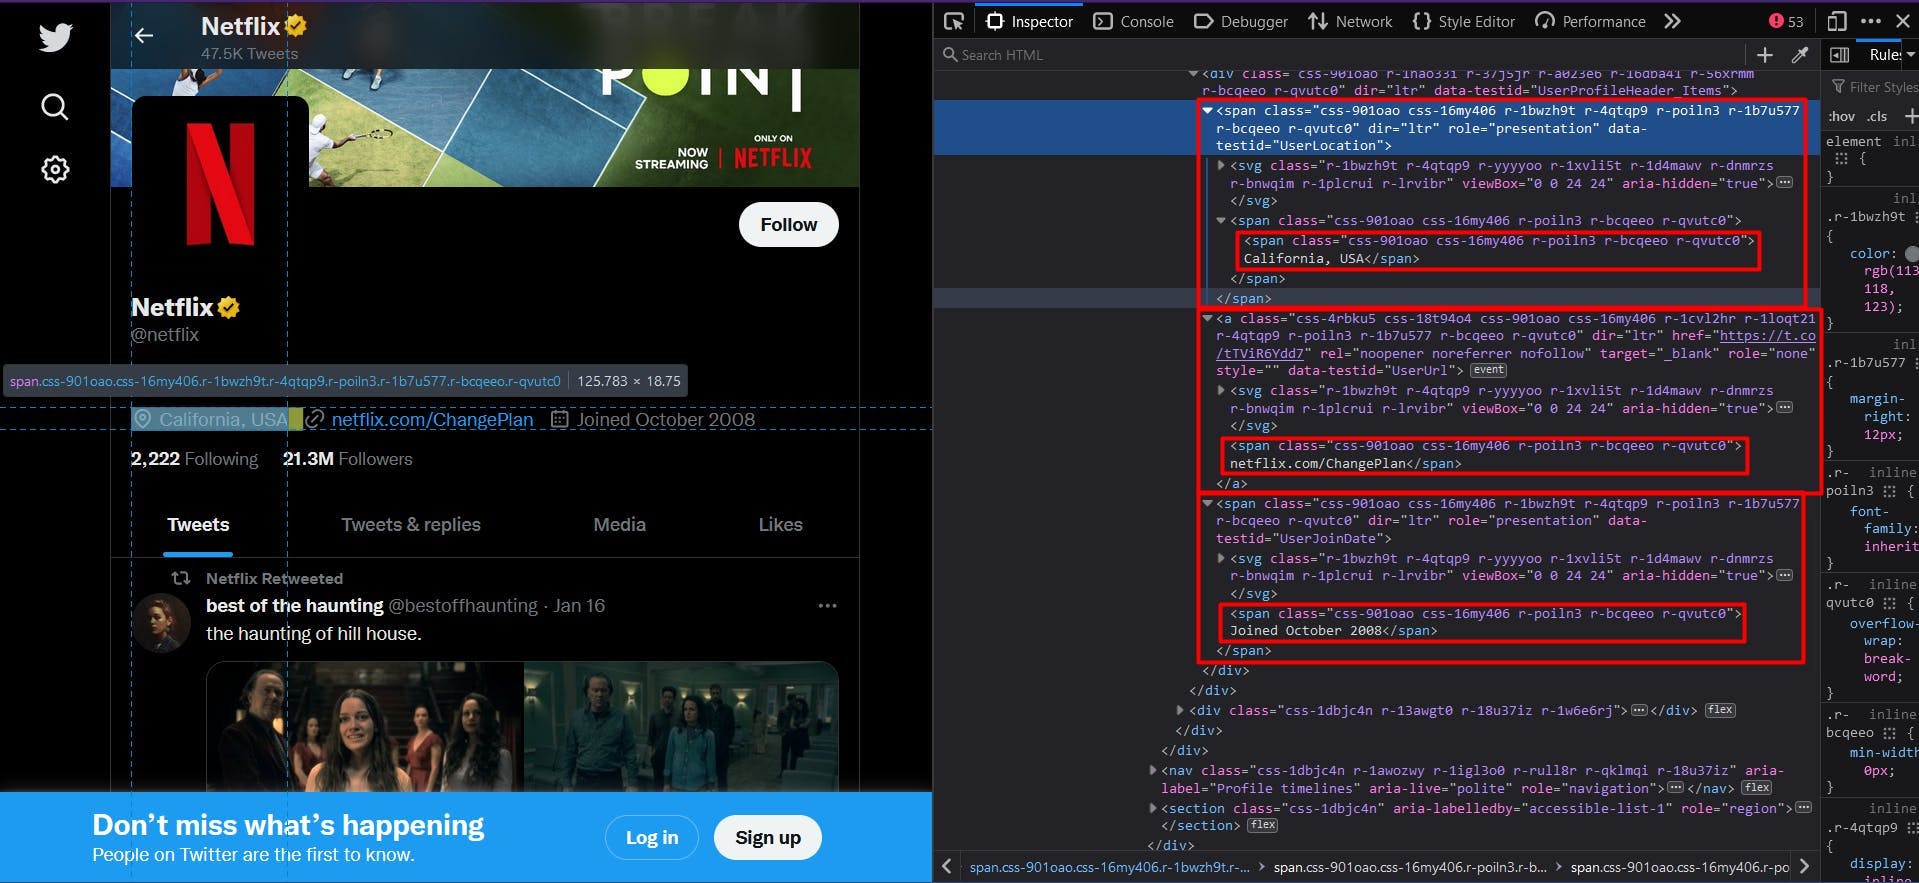
在个人资料的下一部分数据中,我们可以找到相同结构下的地点、网站和加入日期。
// Extract the user location

const profileLocation = await page.evaluate(() => {

    const location = document.querySelector('span[data-testid="UserLocation"]')

    return location ? location.textContent : ""

})

console.log("User location:", profileLocation)

// Extract the user website

const profileWebsite = await page.evaluate(() => {

    const location = document.querySelector('a[data-testid="UserUrl"]')

    return location ? location.textContent : ""

})

console.log("User website:", profileWebsite)

// Extract the join date

const profileJoinDate = await page.evaluate(() => {

    const location = document.querySelector('span[data-testid="UserJoinDate"]')

    return location ? location.textContent : ""

})

console.log("User join date:", profileJoinDate)
要获得关注者和追随者的数量,我们需要采用稍有不同的方法。请看下面的截图:
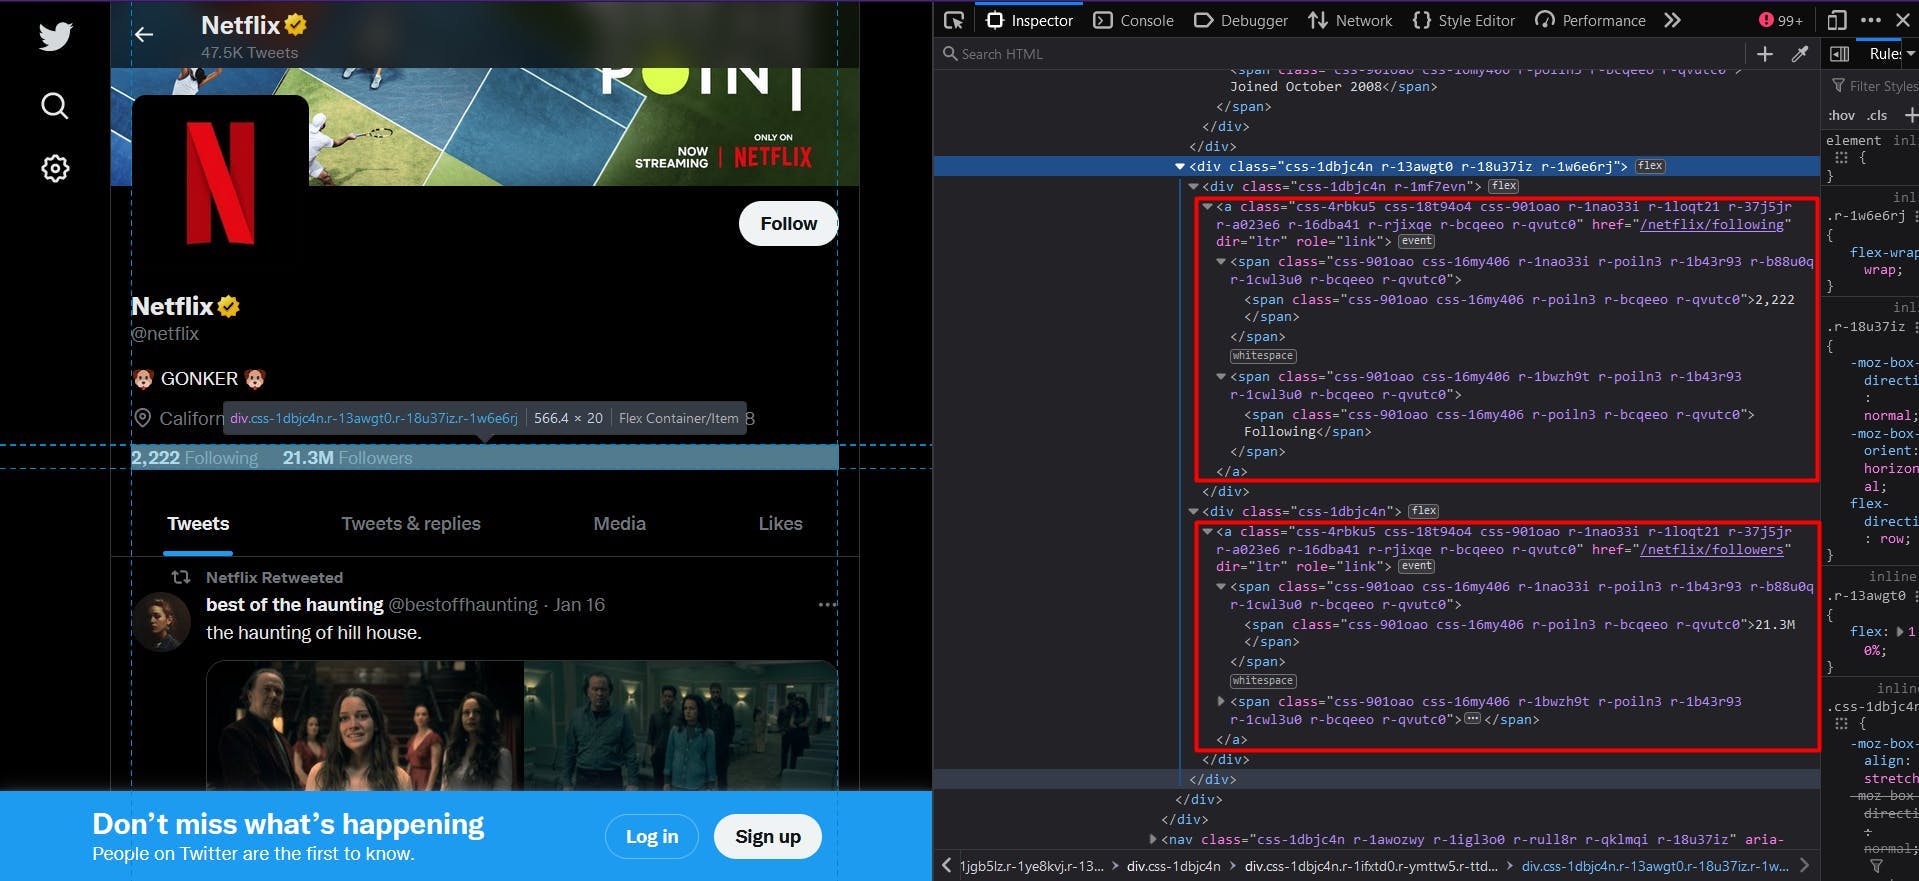
没有 "data-testid "属性,类名仍然是随机生成的。解决的办法是使用锚元素,因为它们提供了唯一的 "href "属性。
// Extract the following count

const profileFollowing = await page.evaluate(() => {

    const location = document.querySelector('a[href$="/following"]')

    return location ? location.textContent : ""

})

console.log("User following:", profileFollowing)

// Extract the followers count

const profileFollowers = await page.evaluate(() => {

    const location = document.querySelector('a[href$="/followers"]')

    return location ? location.textContent : ""

})

console.log("User followers:", profileFollowers)
为了使代码适用于任何 Twitter 配置文件,我们定义了 CSS 选择器,以 "href"属性以"/following"或"/followers"结尾的锚元素为目标。
继续查看推文列表,我们可以再次使用 "data-testid"属性轻松识别每一条推文,如下所示:
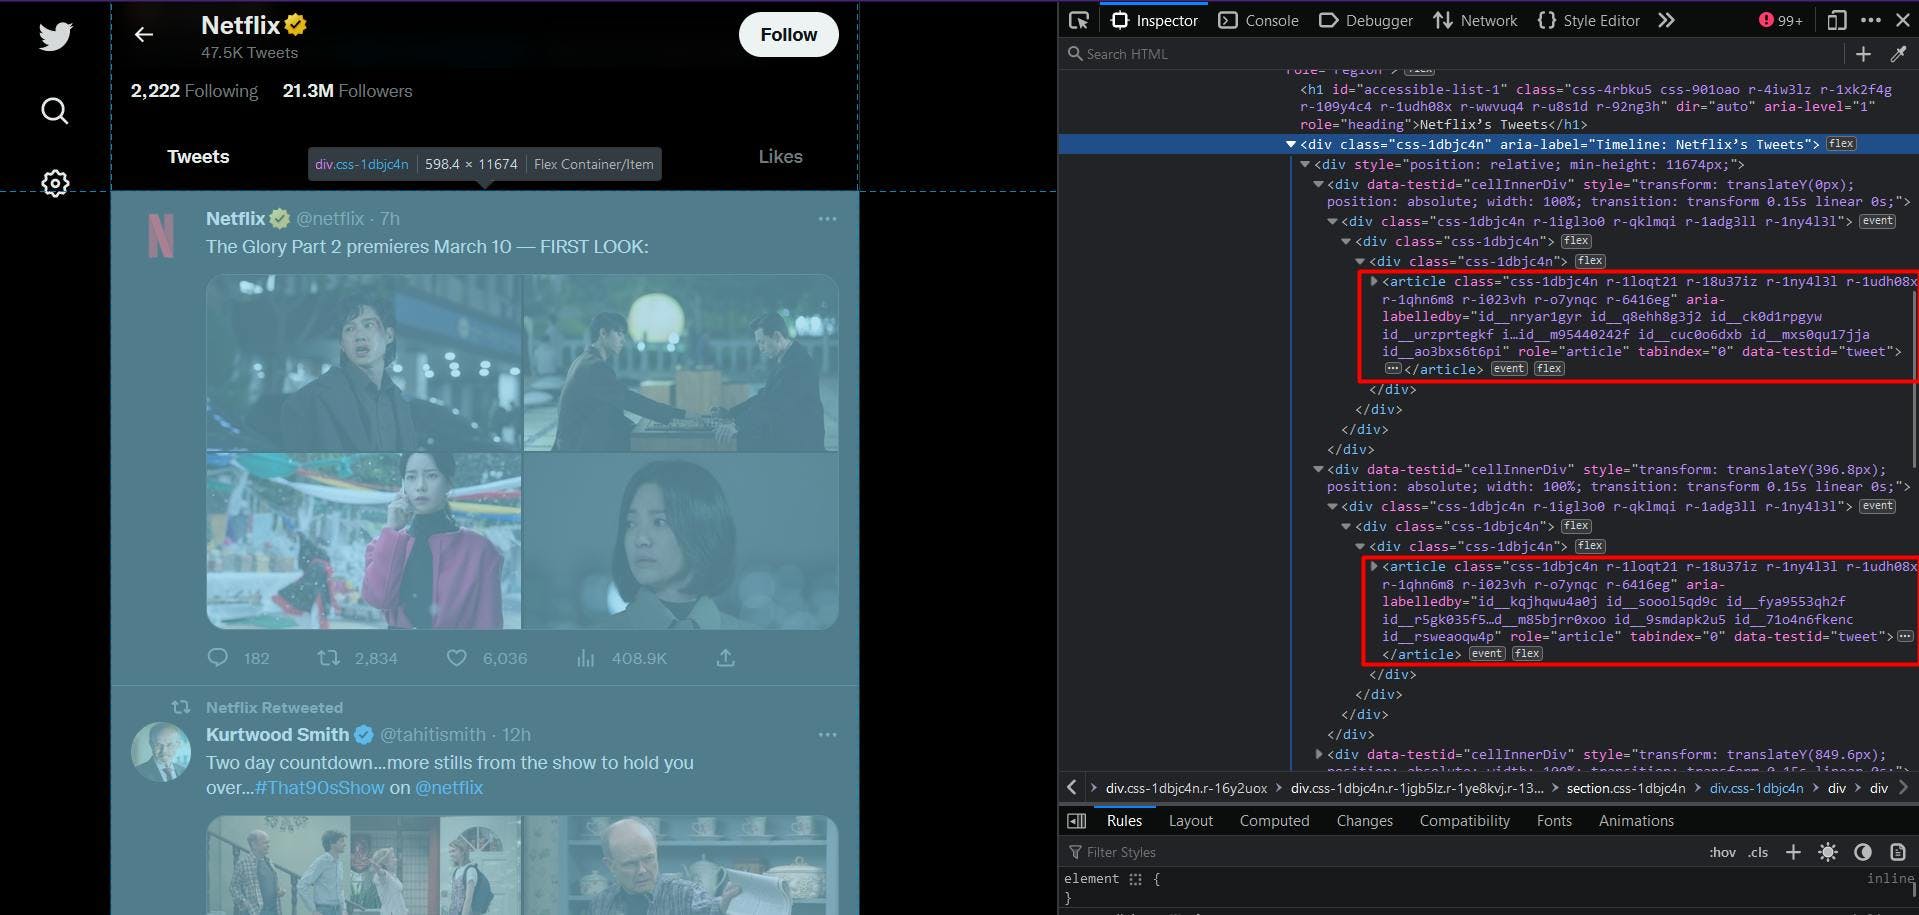
除了使用 "querySelectorAll"方法并将结果转换为 Javascript 数组外,代码与我们在此之前所做的并无不同:
// Extract the user tweets

const userTweets = await page.evaluate(() => {

    const tweets = document.querySelectorAll('article[data-testid="tweet"]')

    const tweetsArray = Array.from(tweets)

    return tweetsArray

})

console.log("User tweets:", userTweets)
不过,尽管 CSS 选择器肯定是正确的,但你可能已经注意到,结果列表几乎总是空的。这是因为推文是在页面加载几秒后才加载的。
解决这个问题的简单方法是在导航到目标 URL 后增加额外的等待时间。一种方法是使用固定的秒数,另一种方法是等待特定的 CSS 选择器出现在 DOM 中:
await page.waitForSelector('div[aria-label^="Timeline: "]')因此,在这里我们指示脚本等待 "aria-label "属性以 "Timeline. "开头的 "div "元素出现在页面上:"在页面上可见。现在,前面的代码段应该可以完美运行了。
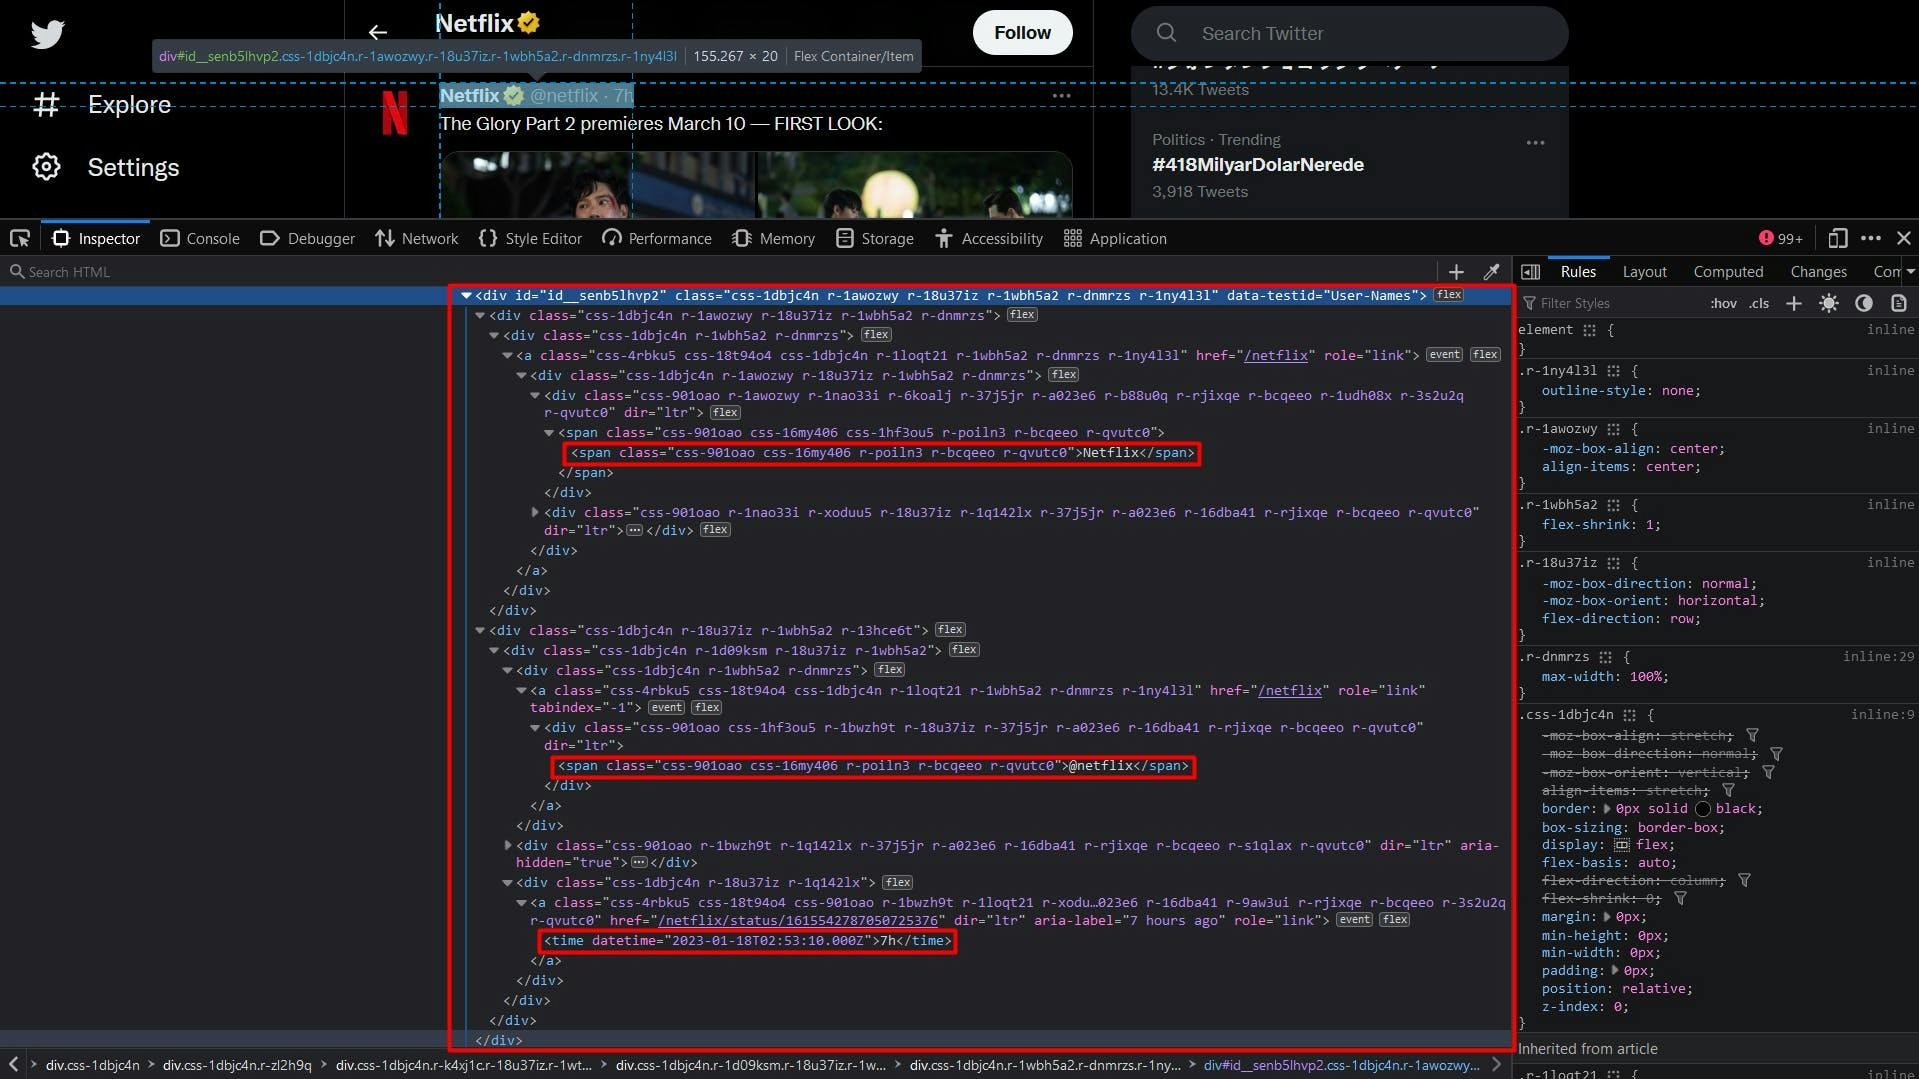
接下来,我们可以像之前一样,使用 "data-testid"属性来识别推文作者的相关数据。
在算法中,我们将遍历 HTML 元素列表,并对每个元素应用 "querySelector"方法。这样,我们就能更好地确保所使用的选择器是唯一的,因为目标范围要小得多。
// Extract the user tweets

const userTweets = await page.evaluate(() => {

    const tweets = document.querySelectorAll('article[data-testid="tweet"]')

    const tweetsArray = Array.from(tweets)

    return tweetsArray.map(t => {

        const authorData = t.querySelector('div[data-testid="User-Names"]')

        const authorDataText = authorData ? authorData.textContent : ""

        const authorComponents = authorDataText.split('@')

        const authorComponents2 = authorComponents[1].split('·')

        return {

            authorName: authorComponents[0],

            authorHandle: '@' + authorComponents2[0],

            date: authorComponents2[1],

        }

    })

})

console.log("User tweets:", userTweets)
关于作者的数据也会在这里出现,因此为了确保结果合理,我们对每个部分都采用了 "拆分"方法。
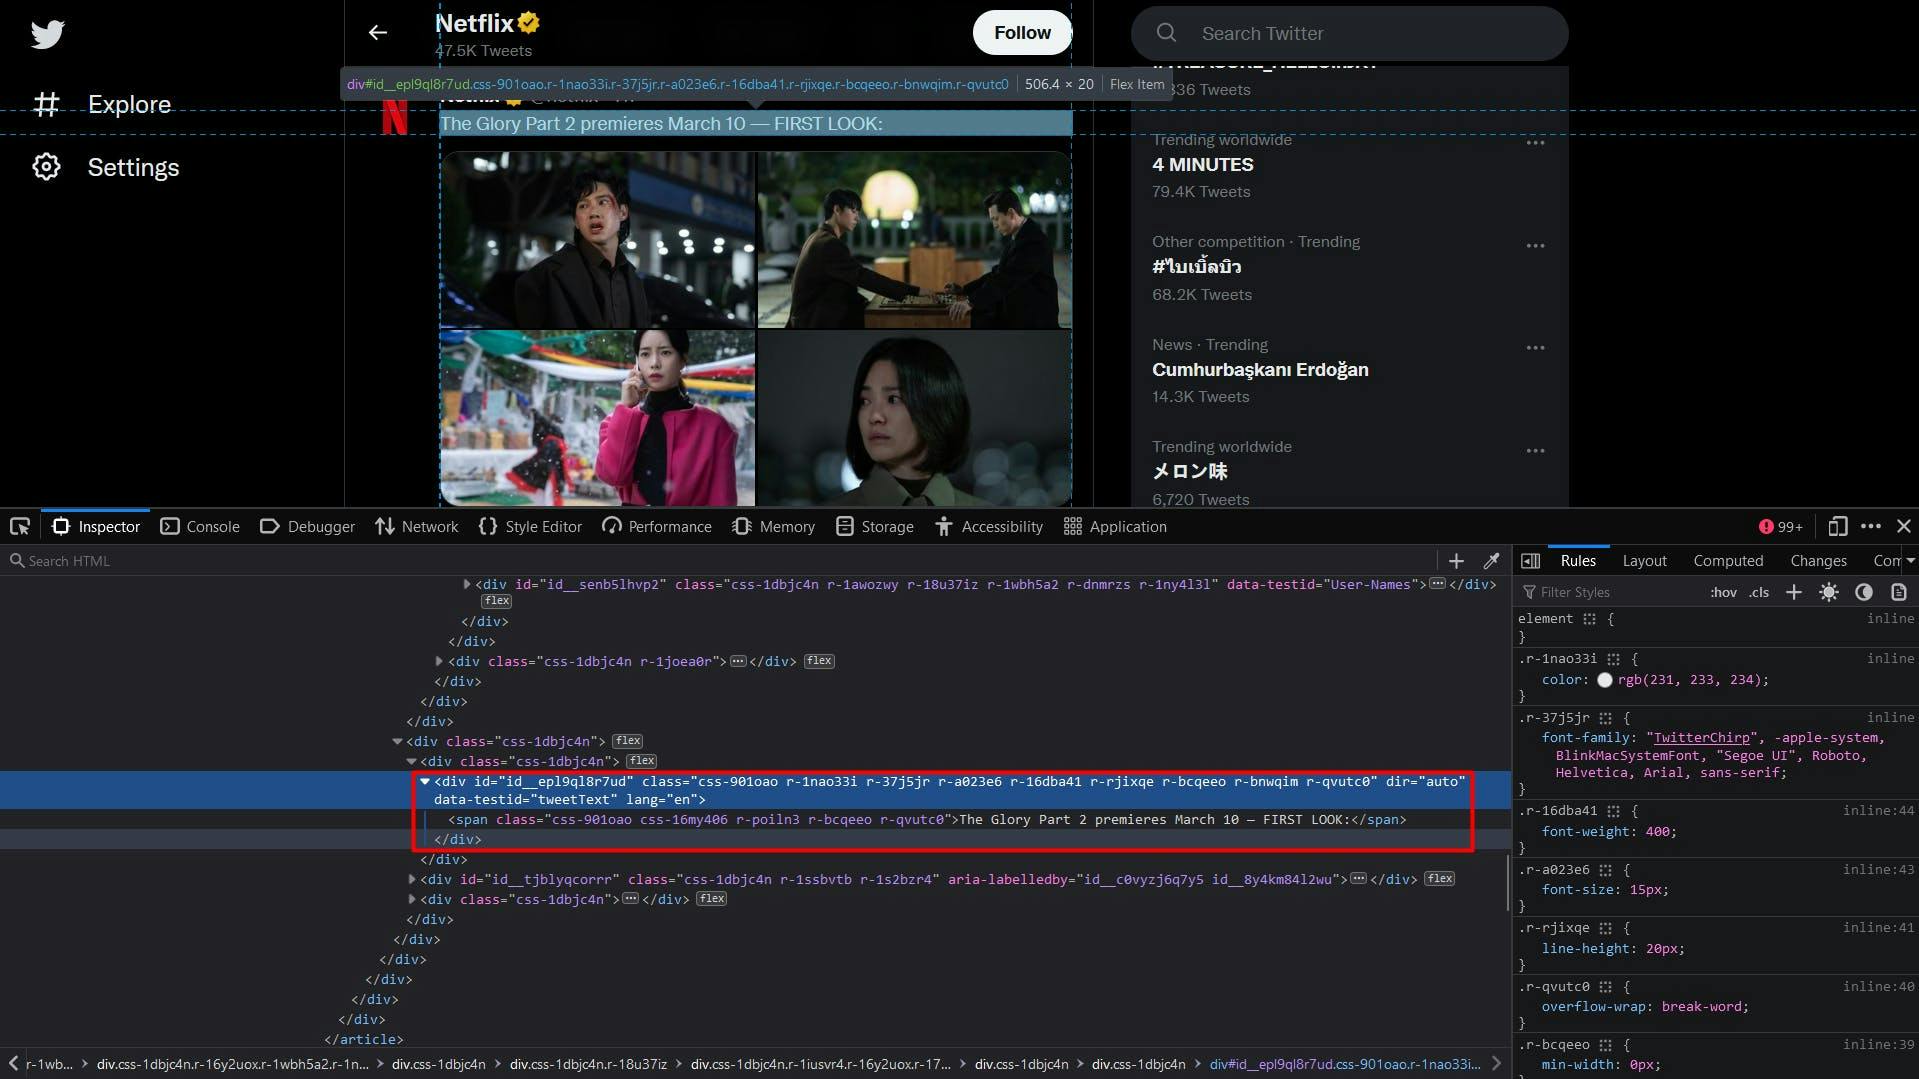
推文的文字内容非常简单:
const tweetText = t.querySelector('div[data-testid="tweetText"]')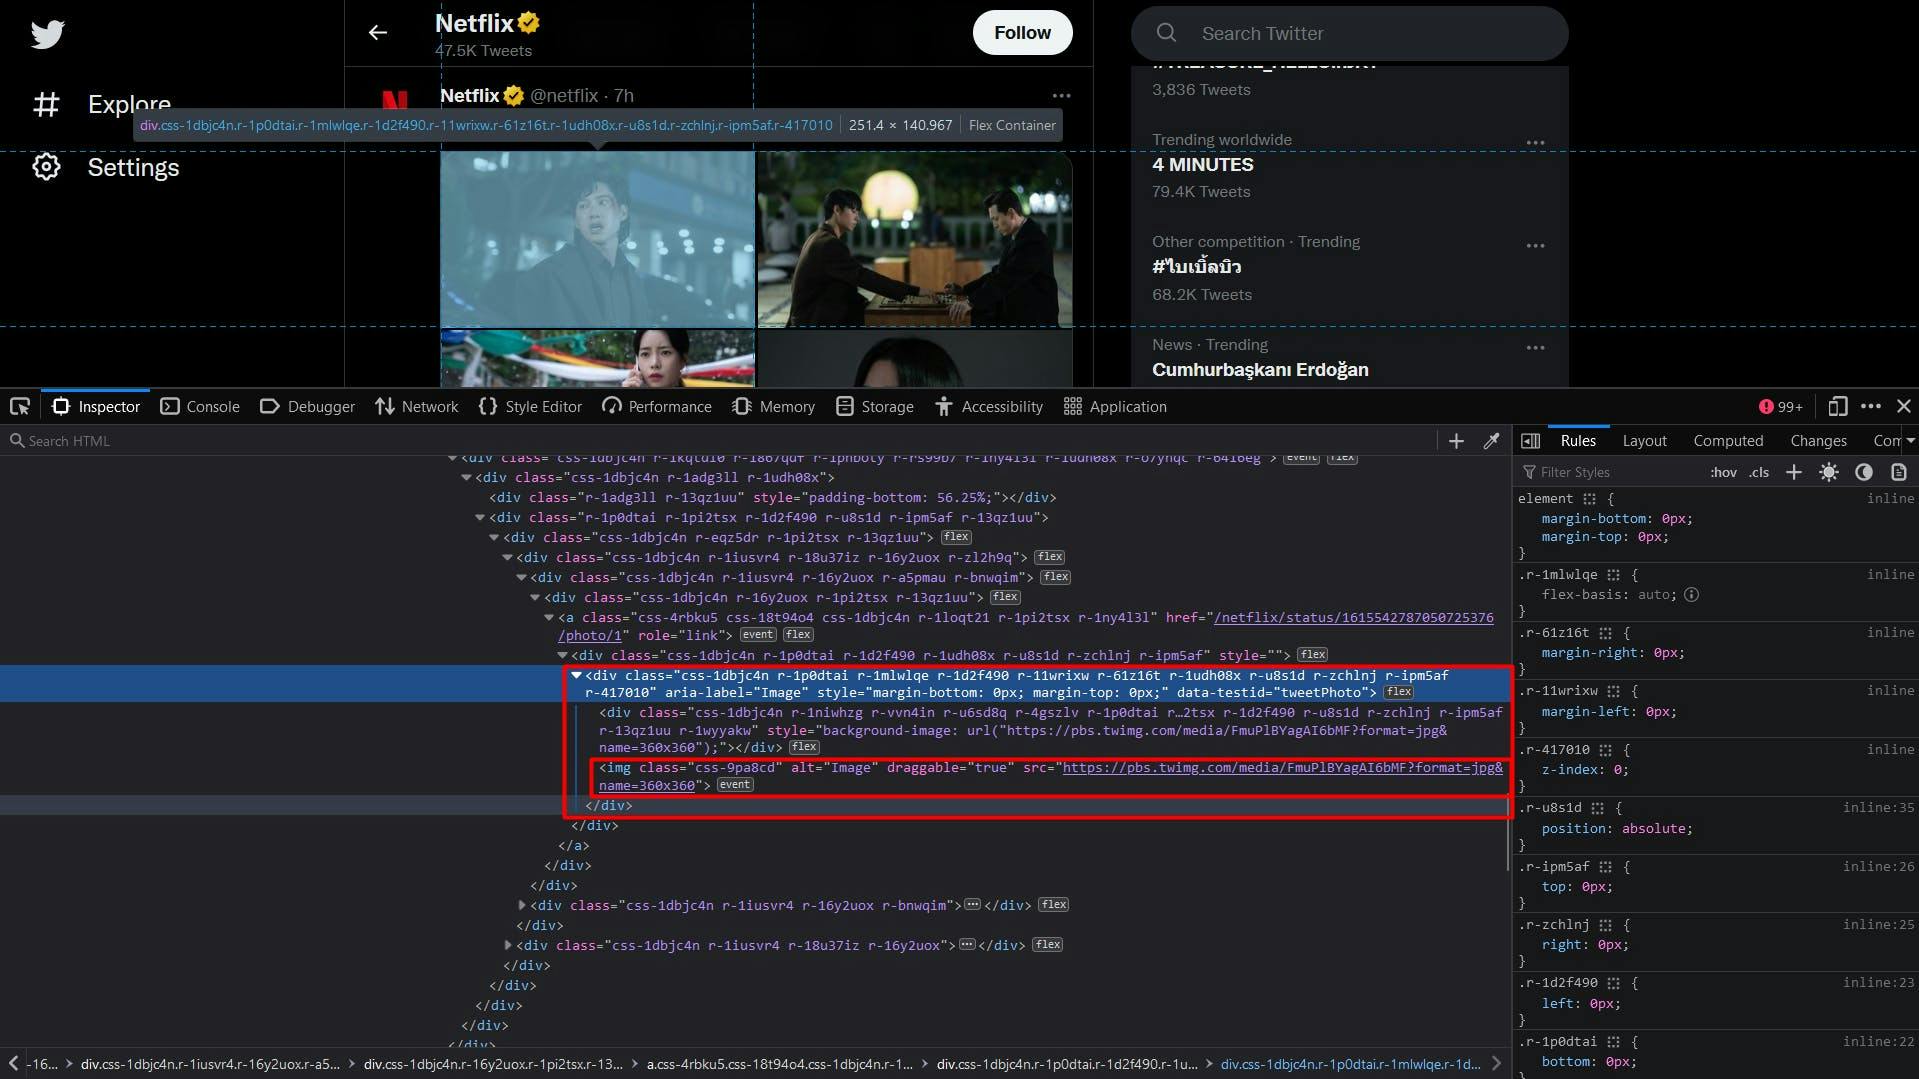
对于推文的照片,我们将提取一个 "img"元素列表,其父元素为 "div"元素,"data-testid"属性设置为 "tweetPhoto"。最终结果将是这些元素的 "src"属性。
const tweetPhotos = t.querySelectorAll('div[data-testid="tweetPhoto"] > img')

const tweetPhotosArray = Array.from(tweetPhotos)

const photos = tweetPhotosArray.map(p => p.getAttribute('src'))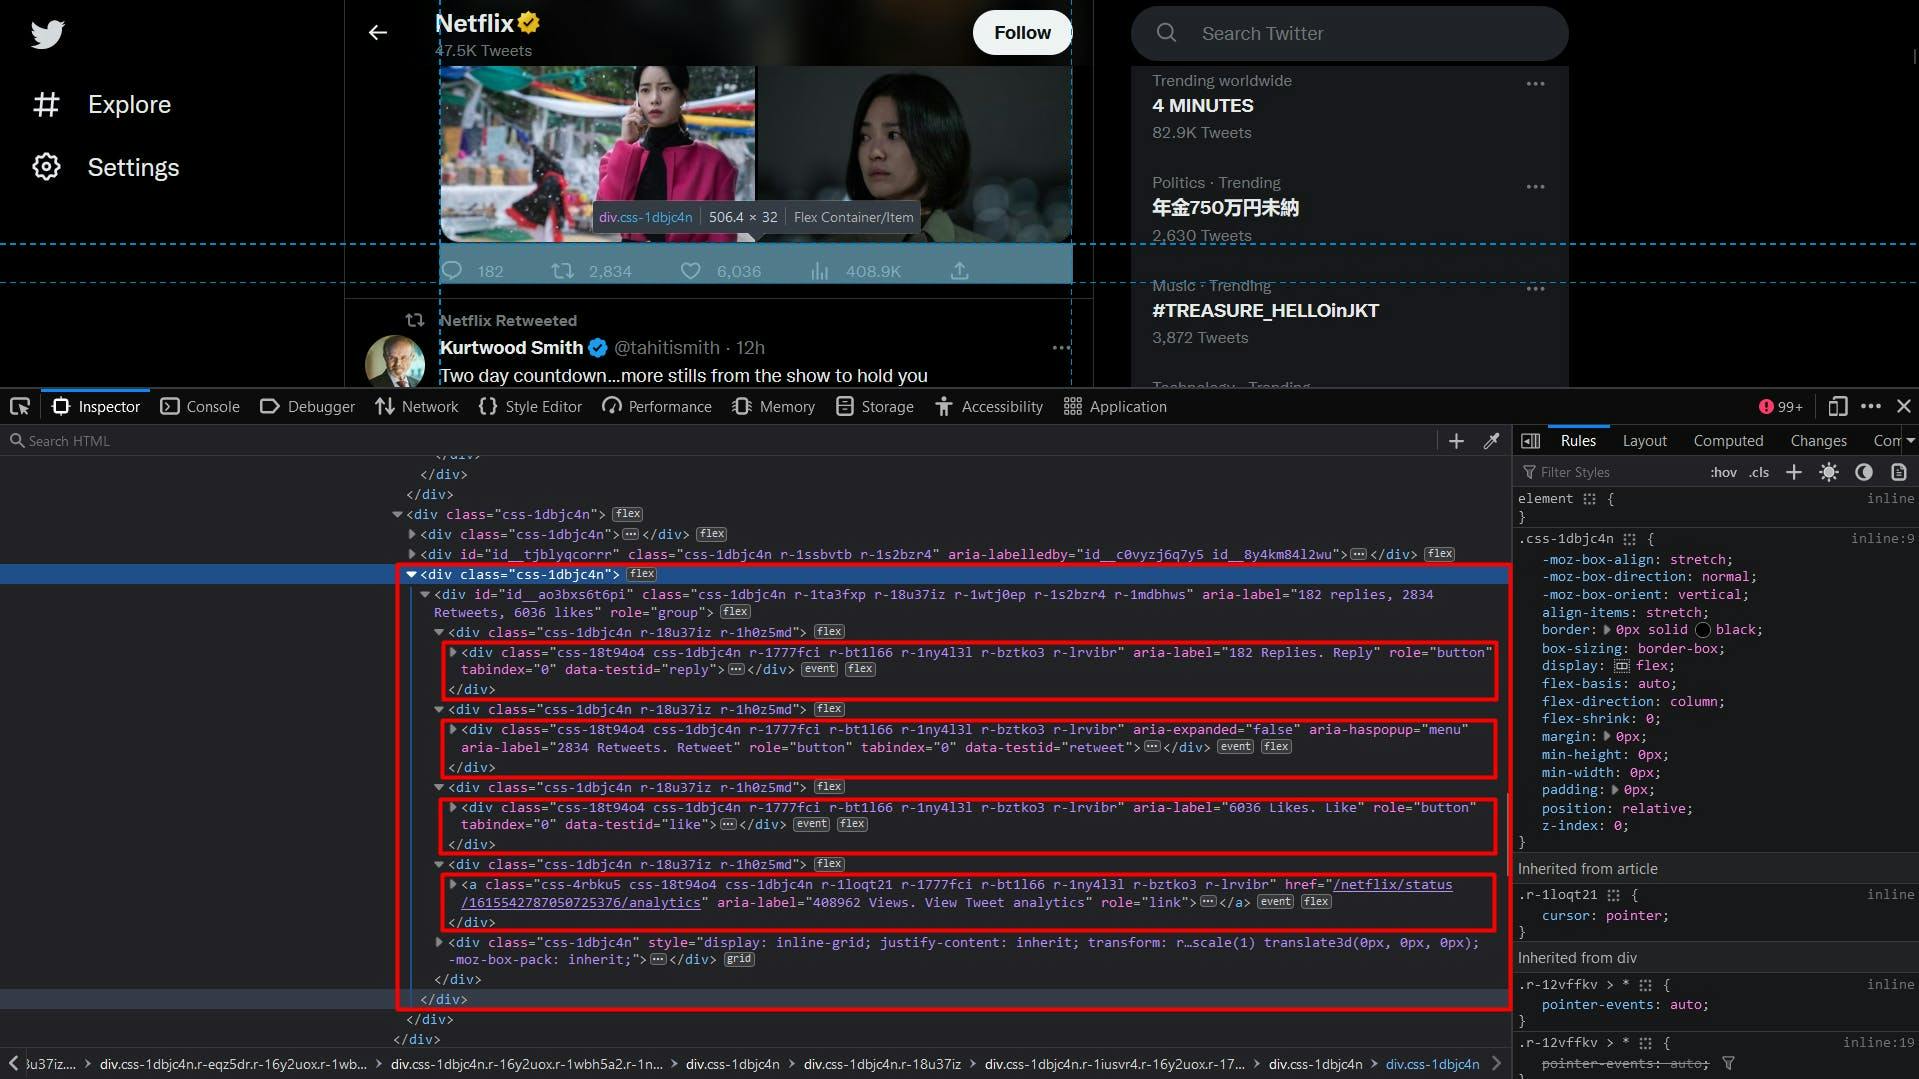
最后是推文的统计部分。在使用 "data-testid"属性标识元素后,我们可以通过 "ria-label"属性的值,以同样的方式访问回复数、转发数和点赞数。
要获得浏览次数,我们要以锚元素为目标,该元素的 "ria-label"属性以 "Views.Views.Tweet"字符串结尾。View Tweet analytics"字符串。
const replies = t.querySelector('div[data-testid="reply"]')

const repliesText = replies ? replies.getAttribute("aria-label") :''

const retweets = t.querySelector('div[data-testid="retweet"]')

const retweetsText = retweets ? retweets.getAttribute("aria-label") :''

const likes = t.querySelector('div[data-testid="like"]')

const likesText = likes ? likes.getAttribute("aria-label") :''

const views = t.querySelector('a[aria-label$="Views. View Tweet analytics"]')

const viewsText = views ? views.getAttribute("aria-label") :''
由于最终结果也会包含字符,因此我们使用 "分割 "方法只提取并返回数值。提取推文数据的完整代码片段如下所示:
// Extract the user tweets

const userTweets = await page.evaluate(() => {

    const tweets = document.querySelectorAll('article[data-testid="tweet"]')

    const tweetsArray = Array.from(tweets)

    return tweetsArray.map(t => {


        // Extract the tweet author, handle, and date

        const authorData = t.querySelector('div[data-testid="User-Names"]')

        const authorDataText = authorData ? authorData.textContent : ""

        const authorComponents = authorDataText.split('@')

        const authorComponents2 = authorComponents[1].split('·')

        // Extract the tweet content

        const tweetText = t.querySelector('div[data-testid="tweetText"]')

        // Extract the tweet photos

        const tweetPhotos = t.querySelectorAll('div[data-testid="tweetPhoto"] > img')

        const tweetPhotosArray = Array.from(tweetPhotos)

        const photos = tweetPhotosArray.map(p => p.getAttribute('src'))

        // Extract the tweet reply count

        const replies = t.querySelector('div[data-testid="reply"]')

        const repliesText = replies ? replies.getAttribute("aria-label") : ''

        // Extract the tweet retweet count

        const retweets = t.querySelector('div[data-testid="retweet"]')

        const retweetsText = retweets ? retweets.getAttribute("aria-label") : ''

        // Extract the tweet like count

        const likes = t.querySelector('div[data-testid="like"]')

        const likesText = likes ? likes.getAttribute("aria-label") : ''

        // Extract the tweet view count

        const views = t.querySelector('a[aria-label$="Views. View Tweet analytics"]')

        const viewsText = views ? views.getAttribute("aria-label") : ''

        return {

            authorName: authorComponents[0],

            authorHandle: '@' + authorComponents2[0],

            date: authorComponents2[1],

            text: tweetText ? tweetText.textContent : '',

            media: photos,

            replies: repliesText.split(' ')[0],

            retweets: retweetsText.split(' ')[0],

            likes: likesText.split(' ')[0],

            views: viewsText.split(' ')[0],

        }

    })

})

console.log("User tweets:", userTweets)
运行整个脚本后,终端应该会显示如下内容:
Profile name: Netflix

Profile handle: @netflix

User bio:

User location: California, USA

User website: netflix.com/ChangePlan

User join date: Joined October 2008

User following: 2,222 Following

User followers: 21.3M Followers

User tweets: [

  {

    authorName: 'best of the haunting',

    authorHandle: '@bestoffhaunting',

    date: '16 Jan',

    text: 'the haunting of hill house.',

    media: [

      'https://pbs.twimg.com/media/FmnGkCNWABoEsJE?format=jpg&name=360x360',

  	'https://pbs.twimg.com/media/FmnGkk0WABQdHKs?format=jpg&name=360x360',

  	'https://pbs.twimg.com/media/FmnGlTOWABAQBLb?format=jpg&name=360x360',

  	'https://pbs.twimg.com/media/FmnGlw6WABIKatX?format=jpg&name=360x360'

    ],

    replies: '607',

    retweets: '37398',

    likes: '170993',

    views: ''

  },

  {

    authorName: 'Netflix',

    authorHandle: '@netflix',

    date: '9h',

    text: 'The Glory Part 2 premieres March 10 -- FIRST LOOK:',

    media: [

  	'https://pbs.twimg.com/media/FmuPlBYagAI6bMF?format=jpg&name=360x360',

  	'https://pbs.twimg.com/media/FmuPlBWaEAIfKCN?format=jpg&name=360x360',

  	'https://pbs.twimg.com/media/FmuPlBUagAETi2Z?format=jpg&name=360x360',

  	'https://pbs.twimg.com/media/FmuPlBZaEAIsJM6?format=jpg&name=360x360'

    ],

    replies: '250',

    retweets: '4440',

    likes: '9405',

    views: '656347'

  },

  {

    authorName: 'Kurtwood Smith',

    authorHandle: '@tahitismith',

    date: '14h',

    text: 'Two day countdown...more stills from the show to hold you over...#That90sShow on @netflix',

    media: [

  	'https://pbs.twimg.com/media/FmtOZTGaEAAr2DF?format=jpg&name=360x360',

  	'https://pbs.twimg.com/media/FmtOZTFaUAI3QOR?format=jpg&name=360x360',

  	'https://pbs.twimg.com/media/FmtOZTGaAAEza6i?format=jpg&name=360x360',

  	'https://pbs.twimg.com/media/FmtOZTGaYAEo-Yu?format=jpg&name=360x360'

    ],

    replies: '66',

    retweets: '278',

    likes: '3067',

    views: ''

  },

  {

    authorName: 'Netflix',

    authorHandle: '@netflix',

    date: '12h',

    text: 'In 2013, Kai the Hatchet-Wielding Hitchhiker became an internet sensation   -- but that viral fame put his questionable past squarely on the radar of authorities. \n' +

  	'\n' +

  	'The Hatchet Wielding Hitchhiker is now on Netflix.',

    media: [],

    replies: '169',

    retweets: '119',

    likes: '871',

    views: '491570'

  }

]
扩大规模
刮擦 Twitter 一开始看似容易,但随着项目规模的扩大,过程会变得更加复杂和具有挑战性。该网站会采用各种技术来检测和防止自动流量,因此您扩大规模后的搜索器会开始受到速率限制,甚至被阻止。
克服这些挑战并继续进行大规模刮擦的方法之一是使用刮擦 API。这类服务提供了一种简单可靠的方式来访问 twitter.com 等网站的数据,而无需构建和维护自己的刮擦器。
WebScrapingAPI 就是这样一种产品。它的代理轮换机制完全避免了阻塞,其扩展的知识库可以随机化浏览器数据,使其看起来像一个真实的用户。
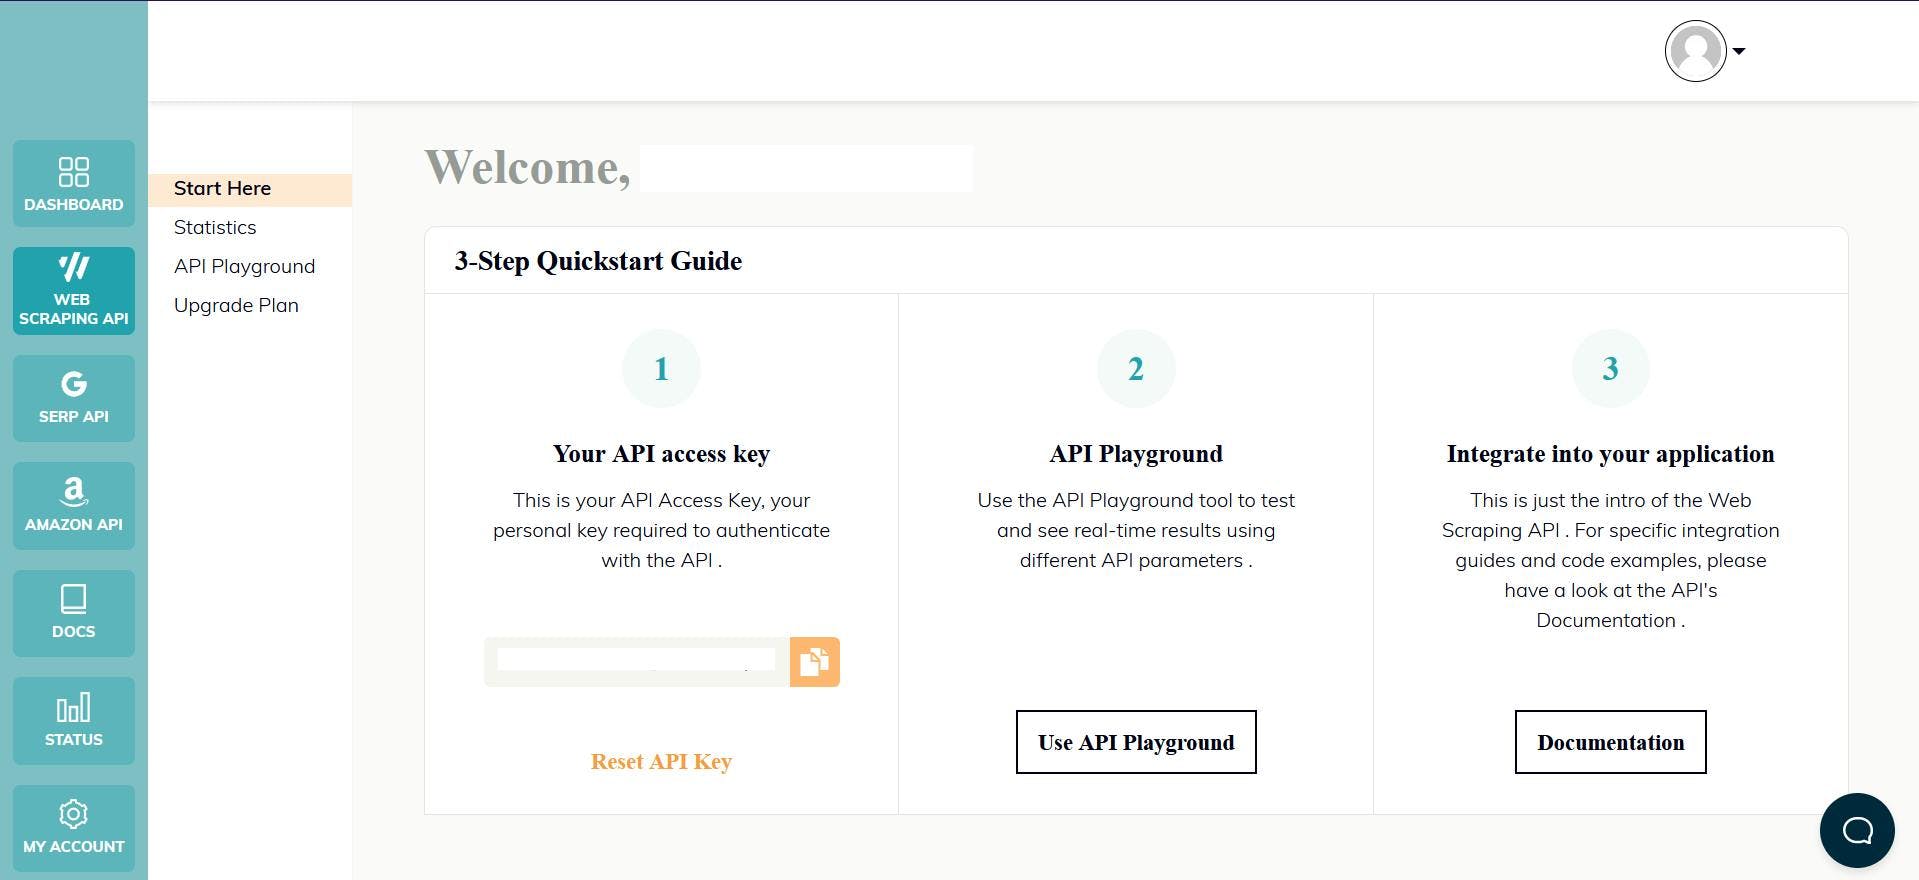
设置简单快捷。你只需注册一个账户,就会收到 API 密钥。您可以在仪表板上访问该密钥,它用于验证您发送的请求。
由于您已经设置了 Node.js 环境,我们可以使用相应的 SDK。运行以下命令将其添加到项目依赖项中:
npm install webscrapingapi
现在只需发送一个 GET 请求,我们就能收到网站的 HTML 文档。请注意,这并不是访问 API 的唯一方式。
import webScrapingApiClient from 'webscrapingapi';

const client = new webScrapingApiClient("YOUR_API_KEY");

async function exampleUsage() {

    const api_params = {

        'render_js': 1,

        'proxy_type': 'residential',

        'wait_for_css': 'div[aria-label^="Timeline: "]',

        'timeout': 30000

    }

    const URL = "https://twitter.com/netflix"

    const response = await client.get(URL, api_params)

    if (response.success) {

        console.log(response.response.data)

    } else {

        console.log(response.error.response.data)

    }

}

exampleUsage();
启用 "render_js "参数后,我们就可以使用无头浏览器发送请求,就像你之前在本教程中所做的那样。
收到 HTML 文档后,您可以使用另一个库来提取感兴趣的数据,比如Cheerio。没听说过?看看这本指南就能帮你入门!
结论
本文全面介绍了如何使用 TypeScript 有效地网络搜刮 Twitter。我们介绍了设置必要环境、定位和提取数据的步骤,以及这些信息的潜在用途。
对于那些希望深入了解消费者情绪、社交媒体监测和商业智能的人来说,Twitter 是一个宝贵的数据源。不过,需要注意的是,仅使用 Twitter API 可能不足以获取所需的全部数据,因此使用专业的搜索器是更好的解决方案。
总之,Twitter 网络搜索可以提供有价值的见解,是任何希望获得竞争优势的企业或个人的重要资产。

相关文章

详细比较 Scrapy 和 Beautiful Soup 这两个领先的网络搜刮工具。了解它们的功能、优缺点,并探索如何将它们结合使用以满足各种项目需求。


